
Exploring the PxPlus IDE
The new IDE in PxPlus 2014 is more than just a pretty interface. It provides an improved structure for accessing common PxPlus tools as well as managing your development projects and tracking their components in today’s world of multitasking. It will help you stay organized so that you can work on multiple projects efficiently.
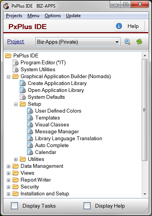
Figure 1: Exploring the tree view of the IDE’s Main window
Let’s take a look at how it works.
The IDE’s Main window
When you open the IDE, you’ll see the Main window. As Figure 1 shows, all of the PxPlus project/non-project based application development tools are arranged in a tree view, providing easy navigation with a familiar, modern look and feel. This launcher is fully customizable and allows multiple tasks to be run simultaneously.
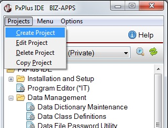
Figure 2: Working with projects
To assist you in multitasking, a project fundamentally defines an environment and list of assigned tasks. A project is therefore a collection of panel objects, programs, reports, and more. You can select a project using the Project drop-down list or you can also click Projects on the title bar menu to create, delete, and copy projects (shown on Figure 2). Projects can be defined as either Private or Public. A working directory is associated with each project and allows processes to be launched in the correct environment by first running any applicable start-up programs.
The IDE’s Tasks window
Checking the Display Tasks box at the bottom left of the IDE’s Main window launches a separate Tasks window containing a History tab as well as a Project tab.
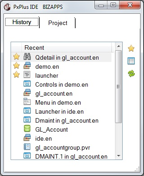
Figure 3: Exploring the History tab of the Tasks window
The History tab displays a list of up to 25 tasks last worked on (across all projects). As you can see in Figure 3, each task type has a unique icon for easy identification. Tasks may be launched simply by double-clicking. Right-clicking displays a pop-up menu which allows tasks to be marked as Favorites (appears at the top of the list flagged with a gold star) or allows tasks to be added to projects.

Figure 4: Exploring the Projects tab of the Tasks window
Figure 4 shows the Projects tab which lists all tasks for the specified project in a tree view that’s grouped into categories (e.g. screen libraries, programs, reports). The same recognizable icons are used. Again, double-clicking launches the task and a pop-up menu allows the tasks to be added or removed from the project.
Tasks aren’t bound to one project, so you can add the same task to multiple projects. It is also possible to add tasks to projects directly from the menu bars located within other PxPlus tools such as the IT Editor, Report Writer, NOMADS and the Data Dictionary.
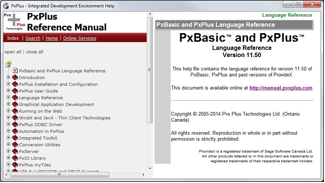
Figure 5: Exploring the Help window
The IDE’s Help window
No matter what you’re doing in the IDE, you can access PxPlus’s online help resources. To do so, simply check the Display Help box at the bottom right of the IDE’s Main window and the PxPlus Reference Manual will be at your fingertips. Clicking on the various selections in the tree view on the Main window will automatically display the help associated with that selection.
You can lock both the Help window and the Tasks window to the Main window without losing the ability to move the two windows around independently. The lock settings as well as the window’s size and location will persist. The next time you open the IDE, the windows will all be the same size and at the same location as they were when you closed it.
Begin your exploration
Explore the IDE and you’ll discover how it can simplify your workflow and help you manage multiple projects! You can find more information about it in the PxPlus Reference Manual.