Yes, You Can Master Project Organization
Developers seldom have the luxury of working on a single project at one time. Juggling multiple assignments can become confusing when each project requires specific development environments or there are simply too many programs, panels, and data files to keep track of easily.
One of the advantages of using the PxPlus IDE (Integrated Development Environment) is that it allows you to organize your development environment by project. Using projects helps you become more productive by automatically controlling your various work environments and keeping your development resources organized and easily accessible.
Step 1: Control your work environment
To define projects, start by accessing the Create Project option from the Projects menu bar at the top of the main PxPlus IDE window.
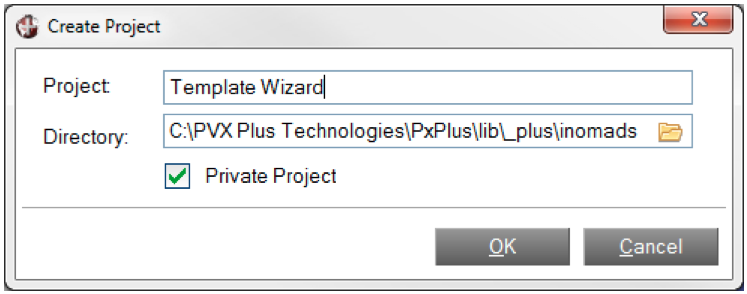
Each project is given a name and a directory, as Figure 1 shows. The project may be kept private in a networked environment by selecting the Private Project check box.
Figure 1: Establishing the Project Name and Directory

While you’re working in a project, the current project name will be displayed in the header portion of the main IDE window. In addition, the PxPlus working directory will be set to correspond with the current project’s directory. Now you don’t have to remember to change the directory every time you switch projects.
To further keep track of things, tasks launched from the IDE are spawned as separate PxPlus processes. Any task with a blue-colored icon before its name in the IDE Launcher is a project-specific task.
Launching a project-specific task will execute the project directory START_UP program (if present). Any global variables, parameters, data, or program prefix rules required for the project environment are usually defined in the START_UP program. Selecting the Data Dictionary, NOMADS designer, or any other project-specific tasks will always happen within the proper development environment.
Step 2: Get organized
The Project tab on the Tasks window of the IDE is a useful tool for organizing your work. The list of task types that you can add to a project has grown since its introduction. The task list now includes all of the following:
- Programs
- NOMADS panel
- Report Writer reports
- Data Dictionary definitions
- Data Files
Once you’ve added a task to a project, accessing it is as simple as double-clicking on the corresponding item.
The Tasks window, accessed by checking the Display Tasks checkbox at the bottom of the main PxPlus IDE window, contains two tabs: the History tab (a list of recently accessed tasks) and the Project tab.
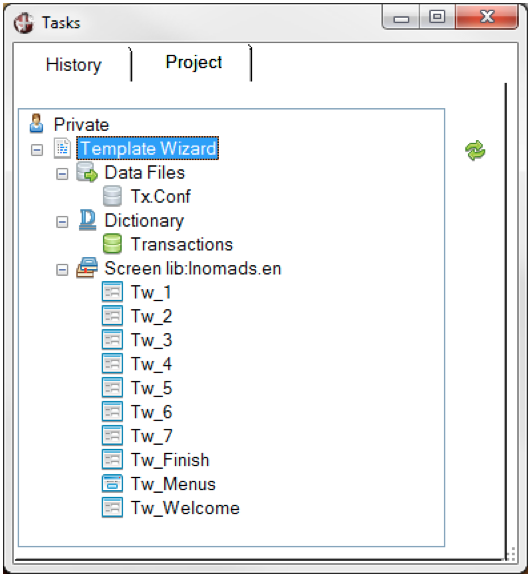
Tasks on the Project tab use the same icons as the History tab. As Figure 2 shows, tasks are grouped by category for easy identification.
Figure 2: Tasks Grouped by Category

In general, you add tasks to a project by selecting the Project/Add to Project option from the menu bar of the program corresponding to the type of task; the table in Figure 3 shows these relationships. You can find more information about adding tasks here.
Figure 3: Programs Related to Task Types
| Task Type | Program |
| Program | IT Editor |
| Single NOMADS panel | NOMADS designer |
| Multiple NOMADS panels | Library Object Section |
| Report | Report Writer |
| Data Dictionary entry | Data Dictionary |
| Data File | File Update Utility |
Alternatively, if the task has been accessed recently, it will be listed in the list box on the History tab of the Tasks window of the IDE. You can add a task to a project from the History tab simply by right-clicking on the task and selecting the option to add it to the current project or any other project.
New: Maintain Projects Utility
While the above methods are useful when adding a few tasks to a project, the Maintain Projects Utility has been designed specifically to allow all types of tasks to be added or deleted from an existing project at one time. To run the utility, select the Maintain Projects Utility task from the main PxPlus IDE window.
Once you have added tasks to the Project tab by any of the above methods, you can launch tasks and screen libraries, remove them from the project, or add them to another project by right-clicking the task and selecting the desired option from the pop-up menu.
Following a few easy steps, you, too, can keep your projects organized.
[cta]Do you have a question about PxPlus or iNomads? We’re here to help. Contact us any time; simply email us at theplus@pvxplus.com or call 1-888-975-PLUS.[/cta]

